Dr. Philip Young is a Double board certified, award winning beauty theorist (read his on Theory on Facial Beauty). Below he discusses in more detail the process of caring for your incisions and wound to help you get the best healing for the most imperceptible scarring.
Note: the most important time for cleaning is the first 48 hours. The importance of cleaning then tapers off as time goes by through the first week or two. You can contact us if you have any questions here: Aesthetic Facial Plastic Surgery Contact. You can also learn about the Top Ten Reasons to Choose Dr. Young and our Team.
Watch How to Clean Your Incisions for Less Scarring & Better Healing
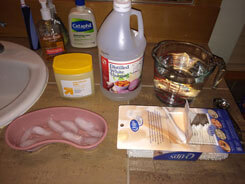
We will discuss Wound Care and Scar Prevention after Plastic Surgery. If you have removable sutures, they should be removed at 5-7 days. So you should have an appointment for the suture removal and for us to check to see how you are healing. There are few things that you might want to have handy: 1. Distilled Water 2. White Grocery Store Vinegar 3. Qtips 4. Silicone Gel or Tape (preferred) 5. Ice Packs or Frozen Peas 6. Vaseline 7. We will often suggest that you wear a wrap after certain procedures (such as brow lifts, face / neck lifts, and facial implant surgery). Here is a link to Plastic Surgery Patient Care page for some of the products you will need. The Silicone Gel and Tape can be purchased at our office that is specifically for Plastic Surgery Procedures. You should look for scar healing gel but look for the ingredients to include silicone or dimethicone.
Other scar healing gels have not been shown scientifically to make a significant difference based on Dr. Young’s recent literature search including: vitamin E, Zinc, Aloe Vera, Arnica, Mederma, etc. Silicone gel / tape was the only ingredient that showed a significant difference (searched through Ovid Medline, and plastic reconstructive journal) in scar improvement. For the first 2 weeks, we would like you to clean your incisions with a mixture of distilled water and vinegar diluted in a 3:1 ratio. You will need 3 parts of distilled to water to every 1 part of the vinegar. If this stings too much you can increase the water concentration. With this mixture, you should clean your incisions twice a day or up to every hour to make sure that you don't have any crusts, blood, and oozing on your incision or wound.
The goal is to have the incision as clean as possible and hopefully the incision as close as possible with the cleaning. After cleaning, we would like you to keep Vaseline on it at all times for the first 2 weeks. Dr. Young usually suggests avoiding hydrogen peroxide and sticking with the vinegar and water mixture. Sometimes hydrogen peroxide can make your scar worse! Usually after the 2 week point, you can start regular skin care unless there are any healing issues. If you have any questions you contact us at any time or email Dr. Young anytime as well. Below is our recommendation for wound care and scar prevention timeline. If you have any questions regarding this you will have multiple ways to get in touch with us either through email, phone (425.990.3223) and even text messaging. Dr. Young strives to be available for all of his patients. For urgent issues, you can call the office and get a hold of him anytime.
“My goal was to find a method to bring back a person’s natural youthfulness without the operated, unnatural look and that is why I have my patients bring in photos of them when they were age 5 to 30. My YoungVitalizer helps restore natural and youthful contours they haven’t seen in years.”
—Dr. Philip Young, Seattle Facial Plastic Surgeon

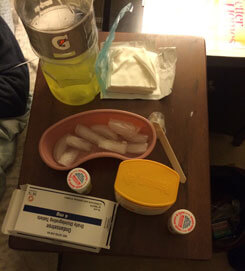
For the icing, you can place the ice in zip lock bags. For eye procedures, you can wet gauze as seen in the picture above into the peach kidney shaped basin with ice and a little water and place the gauze right on the eyes. Always have vaseline on the incisions.
The picture below is a picture of a scar that we excised and it is on day 1 after the procedure. The incision looks fairly clean. If you look closer, most of the incision is well opposed. Meaning, the skin edges are very close together. It is cleaner to the left of the picture, but it starts getting more crusting in the middle and to the right. What we would like is to have all the incision look like how the incision looks on the left. When you look closer at the incision on the left, the edges are closer together with less intervening crusting in between the skin edges. If the incision is maintained as much as possible like the incision on the left the incision will heal very nicely. The portion of the incision in middle will have less optimal healing. The crusts that are left in between the skin edges are essentially a nutritious collection of material for bacteria to feed off of. The proliferation of bacteria where the crusts are tend to make the scar wider.
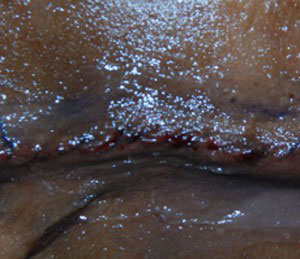
Wound Incision Care Close up Image
The picture below is another area of an incision that was closed the previous day. This incision, in general, looks better than the photo above. There is still some crusting of blood on the left, but most of the incision looks cleaner. Based on this, We would expect the right and middle part of the incision in the photo below to heal better than the left part of the incision. Again to clean the incisions better we would follow the instructions above. Sometimes you don’t want to force the cleaning. If the crusts are really adherent, you will need the frequency of cleaning to be the factor that helps moisten the crusting which will allow the action of subsequent cleaning to remove the crusts more easily. We usually advocate cleaning at least 2 times a day. However, if there is more crusting, or crusting that is more adherent, we would suggest more frequent cleaning in the beginning.
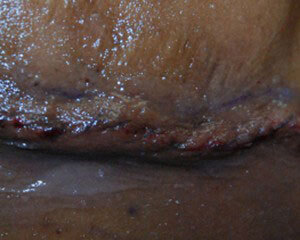
Wound Incision Care Close up Image
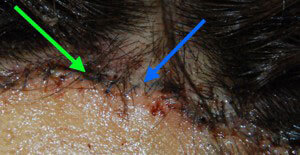
Below is another picture of a person who had their procedure 2 days prior. The green arrow on the left shows crusting that should optimally be cleaned better for more improved results. The blue on the right shows an area that should serve as a visual goal to achieve. Notice that the incision has hardly any crusting in this area and the skin edges are close together. If maintained in this manner, the incision tends to ultimately heal in this manner as well.
Wound Incision Care Close up Image
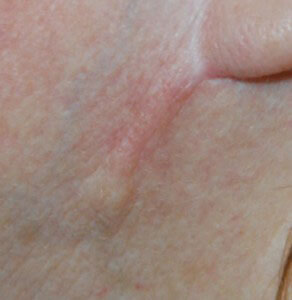
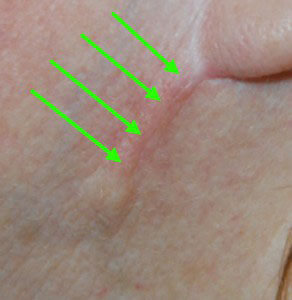
Below is a photo taken 6 weeks later. The image to follow shows where the incision is located with the green arrows. As you can see the incision line is very hard to detect. In fact in this high magnification, the wrinkles or skin lines are more prominent than the incision itself. Under this high magnification, the incision is very hard to detect at all. One important thing to point out is that we acknowledge that the incision is a little elevated. This was done purposefully with the intent of decreasing the wound tension on the skin edges to allow the incision to heal in this fashion. This is an important state that the surgeon should try to achieve for this type of minimally scarring type of healing. Of course as we are detailing on this webpage, the cleaning plays a huge part in this healing process to allow one to achieve results of this nature. The elevation around the incision will settle out over time but helps in ensuring that the scar heals imperceptibly or as good as possible.


 Patient Reviews
 Cards From Patients
 Share Your Story


